
Valentine’s Day is the perfect occasion to indulge in sweet treats, and what better way to celebrate love than with delicious, festive Red Velvet Whoopie Pies? These soft, cake-like cookies with a rich cream cheese filling are a charming and delightful way to spread joy this Valentine’s Day. The combination of rich red velvet flavor and creamy frosting makes these whoopie pies the ultimate dessert for this special day.
Red Velvet Whoopie Pies are perfect for gifting, serving at a Valentine’s Day party, or simply enjoying with your loved ones at home. The striking red color not only makes them visually appealing but also adds to their irresistible allure. These whoopie pies are easy to make, fun to assemble, and offer the perfect balance of sweetness, tanginess, and decadence. If you’re looking to impress your Valentine or just enjoy a delicious homemade treat, these Red Velvet Whoopie Pies are a must-try!

Why You’ll Love This Recipe
1. Festive and Fun
With their vibrant red color and heart-shaped appeal, these whoopie pies are the perfect dessert for Valentine’s Day.
2. Perfect Balance of Sweetness and Tang
The combination of the rich, slightly tangy red velvet cake and the creamy, sweet cream cheese filling creates an irresistible flavor.
3. Easy to Make
This recipe is simple and fun to make, even for beginners, and requires no special tools beyond basic baking equipment.
4. Great for Gifting
Packaged in cute boxes or wrapped individually, these whoopie pies make a thoughtful and charming Valentine’s Day gift.
5. Soft and Chewy Texture
The soft, pillowy texture of the red velvet cookies, paired with the creamy filling, offers the perfect bite every time.
Ingredients
For the Whoopie Pies:
- All-purpose flour
- Cocoa powder
- Baking soda
- Salt
- Unsalted butter
- Brown sugar
- Egg
- Red food coloring
- Buttermilk
- Vanilla extract
- Vinegar
For the Cream Cheese Filling:
- Cream cheese
- Unsalted butter
- Powdered sugar
- Vanilla extract
- Pinch of salt
Variations
- Chocolate Filling: For an extra chocolatey treat, substitute the cream cheese filling with a rich chocolate buttercream.
- Flavoring the Cream Cheese Filling: Add a hint of lemon zest or vanilla extract to the filling for a flavor boost.
- Mini Whoopie Pies: Make smaller versions of the whoopie pies to serve as bite-sized treats.
- Dipped in Chocolate: After assembling the whoopie pies, dip the edges in melted chocolate or drizzle chocolate over the top for an indulgent touch.
How to Make the Recipe
Step 1: Prepare the Baking Sheets
Preheat your oven to 350°F (175°C) and line two baking sheets with parchment paper.
Step 2: Make the Cookie Dough
In a medium bowl, whisk together the flour, cocoa powder, baking soda, and salt. In a separate large bowl, beat the butter and brown sugar until light and fluffy. Add the egg and mix until combined. Then, add the red food coloring and vanilla extract, mixing until the dough turns a vibrant red.
Step 3: Add Wet and Dry Ingredients
Alternately add the dry ingredients and buttermilk to the wet mixture, starting and ending with the dry ingredients. Add the vinegar and mix until just combined. Be careful not to overmix the batter.
Step 4: Form the Cookies
Scoop tablespoon-sized amounts of dough onto the prepared baking sheets, spacing them about 2 inches apart. Use the back of the spoon or your fingers to gently flatten each mound of dough into a disc shape.
Step 5: Bake
Bake the cookies for 8-10 minutes, or until a toothpick inserted into the center comes out clean. Let the cookies cool on the baking sheet for 5 minutes, then transfer them to a wire rack to cool completely.
Step 6: Make the Cream Cheese Filling
In a large bowl, beat together the cream cheese and butter until smooth and creamy. Gradually add the powdered sugar, vanilla extract, and a pinch of salt, beating until the filling is light and fluffy.
Step 7: Assemble the Whoopie Pies
Once the cookies are completely cool, spread a generous amount of cream cheese filling on the flat side of one cookie. Top it with another cookie, flat side down, to form a sandwich. Gently press the cookies together to evenly distribute the filling.
Step 8: Serve and Enjoy
Serve your Red Velvet Whoopie Pies immediately, or store them in an airtight container in the fridge for up to 3 days.

Tips for Making the Recipe
- Don’t Overmix the Batter: Overmixing can result in tough cookies. Mix just until the ingredients are combined for soft, tender whoopie pies.
- Use Buttermilk for Tenderness: Buttermilk helps keep the cookies soft and adds a subtle tang that complements the cream cheese filling.
- Cool Completely Before Assembling: Make sure the cookies are fully cooled before adding the filling, otherwise the cream cheese filling may melt or soften too much.
- Chill the Filling: If the cream cheese filling is too soft to spread, refrigerate it for a few minutes to firm it up.
- For Neat Edges: If you want to make your whoopie pies extra neat, pipe the cream cheese filling using a piping bag fitted with a round tip for clean, precise filling.
How to Serve
These Red Velvet Whoopie Pies are perfect for any Valentine’s Day celebration. Serve them on a dessert table, gift them to loved ones, or enjoy them as a special treat with a cup of tea or coffee. You can also decorate them with sprinkles, edible glitter, or heart-shaped decorations for a festive touch.
Make Ahead and Storage
Storing Leftovers
Store any leftover whoopie pies in an airtight container in the fridge. They will stay fresh for up to 3 days. If they’re too cold, let them come to room temperature for the best flavor and texture.
Freezing
You can freeze the assembled whoopie pies for up to 2 months. To freeze, place the whoopie pies in a single layer on a baking sheet and freeze until firm. Then, transfer them to an airtight container or freezer bag. Thaw in the fridge or at room temperature before serving.
Reheating
Although these whoopie pies are best enjoyed fresh, you can microwave them for about 10-15 seconds if you prefer them a little warm. Be careful not to overheat them, as the cream cheese filling can melt.
FAQs
1. Can I use regular milk instead of buttermilk?
While buttermilk gives the whoopie pies their tender texture, you can substitute regular milk with a tablespoon of lemon juice or vinegar to mimic the acidity of buttermilk.
2. Can I make the cookies ahead of time?
Yes, you can bake the cookies in advance and store them in an airtight container for up to 3 days. Assemble the whoopie pies when you’re ready to serve them.
3. How can I make these whoopie pies gluten-free?
To make the whoopie pies gluten-free, substitute the all-purpose flour with a gluten-free flour blend that is designed for baking.
4. How long do the whoopie pies need to cool?
Let the cookies cool on the baking sheet for 5 minutes, then transfer them to a wire rack to cool completely before assembling the whoopie pies.
5. Can I use store-bought frosting instead of cream cheese filling?
While store-bought frosting can work in a pinch, the homemade cream cheese filling adds a special touch and a more authentic flavor.
6. How do I make the red color more vibrant?
Use a high-quality gel food coloring, as it will give the whoopie pies a more intense red color than liquid food coloring.
7. Can I make these whoopie pies in a different flavor?
Yes, you can make these whoopie pies in any flavor you prefer. Try a chocolate or vanilla version by adjusting the cake base flavor accordingly.
8. Can I freeze the cream cheese filling?
It’s not recommended to freeze the cream cheese filling, as it may change in texture once thawed. It’s best to prepare the filling fresh.
9. Can I add chocolate chips to the batter?
Yes, you can stir in some mini chocolate chips to the cookie dough for added texture and flavor.
10. How do I prevent the filling from oozing out?
Be sure to use a generous but controlled amount of filling and gently press the cookies together. If the filling oozes out, it may be too soft—chill it for a few minutes before assembling.

Conclusion
Valentine’s Red Velvet Whoopie Pies are a sweet, irresistible treat that will make your holiday even more special. Their soft texture, creamy filling, and vibrant color make them the perfect dessert for your Valentine’s Day celebration. Whether you’re sharing them with a loved one, gifting them to friends, or enjoying them solo, these whoopie pies are sure to bring smiles and joy to everyone who tastes them. Make this Valentine’s Day extra sweet with these delightful homemade treats!
Print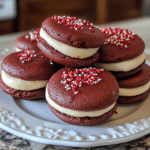
Valentine’s Red Velvet Whoopie Pies
- Total Time: 30-35 minutes (plus cooling time)
- Yield: 12 whoopie pies (24 cookies total) 1x
- Diet: Vegetarian
Description
Celebrate the season of love with these Valentine’s Red Velvet Whoopie Pies! Soft, fluffy red velvet cakes sandwiched together with a creamy, tangy cream cheese filling. These vibrant, delicious treats are perfect for sharing with your special someone or as a fun, festive addition to any Valentine’s Day celebration. They’re easy to make and absolutely irresistible!
Ingredients
For the Whoopie Pies:
- 2 1/2 cups all-purpose flour
- 1 1/2 tsp baking powder
- 1 tsp baking soda
- 1 tbsp cocoa powder
- 1/2 tsp salt
- 1 cup unsalted butter, softened
- 1 1/4 cups granulated sugar
- 2 large eggs
- 1 tbsp red food coloring (or as needed)
- 1 tsp vanilla extract
- 1/2 cup buttermilk
- 1 tbsp white vinegar
For the Cream Cheese Filling:
- 8 oz cream cheese, softened
- 1/4 cup unsalted butter, softened
- 2 cups powdered sugar
- 1 tsp vanilla extract
- Pinch of salt
Instructions
-
Preheat the oven: Preheat your oven to 350°F (175°C) and line two baking sheets with parchment paper.
-
Prepare the wet ingredients: In a large mixing bowl, cream together the softened butter and sugar until light and fluffy. Add the eggs, one at a time, beating well after each addition. Stir in the vanilla extract and red food coloring.
-
Mix the dry ingredients: In a separate bowl, whisk together the flour, baking powder, baking soda, cocoa powder, and salt.
-
Combine wet and dry ingredients: Gradually add the dry ingredients to the wet ingredients, alternating with the buttermilk and vinegar. Start and end with the dry ingredients, mixing just until combined.
-
Scoop the batter: Use a spoon or an ice cream scoop to drop tablespoon-sized portions of the batter onto the prepared baking sheets, spacing them about 2 inches apart.
-
Bake the pies: Bake for 10-12 minutes, or until a toothpick inserted into the center comes out clean. Remove from the oven and let cool on the baking sheets for 5 minutes before transferring to wire racks to cool completely.
-
Make the cream cheese filling: While the pies are cooling, beat together the softened cream cheese, butter, powdered sugar, vanilla extract, and a pinch of salt until smooth and fluffy.
-
Assemble the whoopie pies: Once the red velvet cookies have cooled, spread a generous amount of cream cheese filling on the flat side of one cookie. Top with another cookie, flat side down, to form a sandwich.
-
Serve: Serve immediately or refrigerate in an airtight container. These are best enjoyed within a few days for maximum freshness!
Notes
- You can substitute the cream cheese filling with buttercream frosting for a different flavor.
- For a festive touch, sprinkle with red sprinkles or dust with powdered sugar.
- The batter can be made ahead of time and stored in the refrigerator for up to 24 hours before baking.
- Prep Time: 20 minutes
- Cook Time: 10-12 minutes
- Category: Dessert, Cookies
- Method: Baking
- Cuisine: American
Keywords: red velvet whoopie pies, Valentine’s Day dessert, whoopie pies, red velvet cookies, cream cheese filling, Valentine’s treats