
Easter is the perfect time to celebrate with family, friends, and, of course, delicious treats. These Easter Egg Oreo Cookie Balls are the ultimate indulgence for anyone with a sweet tooth. Combining the crunchy, sweet goodness of Golden Oreos and rich, creamy cream cheese, these bite-sized delights are dipped in white candy coating and decorated with vibrant colors to resemble Easter eggs. With minimal ingredients and a simple process, these festive treats are a breeze to make and perfect for any springtime celebration.
Not only are these Oreo cookie balls adorable, but they also pack a rich, decadent flavor that everyone will love. Whether you’re planning a holiday party, making a gift for loved ones, or simply enjoying a fun activity with kids, these little treats are sure to brighten up your Easter festivities. Let’s dive into why you’ll love making (and eating) these adorable Oreo Cookie Balls.
Why You’ll Love This Recipe
- Simple Ingredients: You only need a handful of ingredients to make these delicious treats.
- Perfect for Easter: Their fun egg shape and vibrant colors make them ideal for spring celebrations.
- No-Bake: These cookie balls require no baking, making them super easy and quick to prepare.
- Customizable: You can easily decorate them with any colors you like, perfect for adding a personal touch.
- Crowd-Pleaser: These bite-sized treats are a hit with both kids and adults alike.

Ingredients
- 14.3 oz package (36 cookies) Golden Oreos, crushed into crumbs
- 8 oz cream cheese, at room temperature
- 10 oz white candy coating
- Additional 1 oz of white candy coating per color for decorating
- Gel icing colors
Variations
- Chocolate Coating: Substitute the white candy coating with dark or milk chocolate for a different flavor.
- Flavor Swap: Use regular Oreos or flavored Oreos (like mint or peanut butter) for a new twist.
- Add Sprinkles: Decorate with colorful sprinkles, mini chocolate chips, or edible glitter for extra fun.
- Nutty Version: Add chopped nuts like pecans or almonds into the cookie ball mixture for added crunch.
- Dipped in Rainbow: Use multiple candy coating colors to create a rainbow effect for a festive touch.
How to Make the Recipe
Step 1: Crush the Oreos
Place the Golden Oreos in a food processor and pulse until they become fine crumbs. Alternatively, you can place the cookies in a plastic bag and crush them with a rolling pin.
Step 2: Mix with Cream Cheese
In a large bowl, mix the Oreo crumbs with the softened cream cheese. Use a spatula or your hands to blend until well combined. The mixture should hold together when pressed.
Step 3: Shape the Balls
Roll the mixture into small, egg-shaped balls (about 1 inch in diameter) and place them on a baking sheet lined with parchment paper.
Step 4: Freeze
Place the cookie balls in the freezer for about 30 minutes to allow them to firm up. This will help them hold their shape when dipped in the candy coating.
Step 5: Melt the Candy Coating
While the balls are chilling, melt the white candy coating according to the package instructions. If you’d like to decorate with multiple colors, melt small amounts of additional white candy coating in separate bowls and add gel icing colors to each for vibrant, Easter-themed hues.
Step 6: Dip the Cookie Balls
Once the cookie balls are chilled and the candy coating is ready, dip each ball into the melted coating, covering it completely. Place the coated balls back on the parchment-lined baking sheet.
Step 7: Decorate
Before the coating hardens, drizzle or dip the balls with the colored candy coatings for decorative designs, or simply dip half of the ball in one color for a fun Easter egg effect.
Step 8: Set and Serve
Let the decorated Oreo balls set for about 30 minutes or until the candy coating hardens completely. Once they’re firm, serve them as a delicious, festive treat.

Tips for Making the Recipe
- Cream Cheese Consistency: Make sure the cream cheese is softened to room temperature for easy mixing and smooth texture.
- Use Gel Colors: Gel icing colors work better than liquid food coloring to keep the coating from becoming too runny.
- Chill the Balls: Freezing the cookie balls before dipping helps the coating set properly and prevents them from falling apart.
- Melting Candy Coating: If the candy coating becomes too thick while melting, add a small amount of vegetable oil to thin it out.
How to Serve
These Easter Egg Oreo Cookie Balls make a fun centerpiece on any dessert table or as a tasty addition to an Easter basket. Serve them at your springtime parties, family gatherings, or as a sweet treat for kids after an Easter egg hunt. They’re also perfect for gifting in cute jars or wrapping them in colorful cellophane bags as a homemade present.
Make Ahead and Storage
Storing Leftovers
Store any leftover Oreo cookie balls in an airtight container in the refrigerator for up to 1 week.
Freezing
These cookie balls freeze well! Place them in a single layer on a baking sheet, freeze until solid, then transfer them to a freezer-safe container or bag. They can be frozen for up to 2 months.
Reheating
Since this recipe is no-bake, there’s no need to reheat. Just allow the frozen cookie balls to thaw in the refrigerator for a few hours before serving.
FAQs
1. Can I use regular Oreos instead of Golden Oreos?
Yes, you can swap Golden Oreos with regular chocolate Oreos for a different flavor, but the appearance will be different.
2. Can I make these cookie balls in advance?
Absolutely! You can prepare them a day or two ahead of time and store them in the refrigerator or freezer.
3. Can I use white chocolate chips instead of candy coating?
Yes, but make sure to melt them gently and add a small amount of shortening or vegetable oil to ensure a smooth texture.
4. Can I use a different type of candy coating?
You can use dark or milk chocolate candy coating for a different flavor, but be aware that it may alter the look of the Easter egg effect.
5. How do I get the candy coating smooth?
Make sure your candy coating is melted slowly and consistently, adding a bit of vegetable oil if necessary to ensure smoothness.
6. Can I decorate these without gel colors?
Yes! You can use sprinkles, colored sugar, or pre-made edible decorations for an easier decorating option.
7. How do I prevent the coating from melting in warm temperatures?
Store the Oreo balls in the refrigerator or freezer until you’re ready to serve them, especially in warmer weather.
8. Can I dip these in other coatings like coconut or crushed nuts?
Yes, after dipping the balls in the candy coating, roll them in coconut flakes, crushed nuts, or mini chocolate chips for a fun texture variation.
9. How long do these Oreo cookie balls last?
They stay fresh for up to 1 week in the fridge or 2 months in the freezer.
10. Can I make these without the candy coating?
While the candy coating gives them a deliciously crisp shell, you can skip it and roll the Oreo balls in powdered sugar or cocoa powder for a simpler version.

Conclusion
These Easter Egg Oreo Cookie Balls are the perfect no-bake treat to bring a little fun and festive cheer to your Easter celebrations. With their creamy, sweet filling, crisp candy coating, and adorable egg shape, they’re sure to be a hit with everyone at the table. Whether you’re preparing them for a special occasion or just treating yourself, these treats are a breeze to make and an absolute delight to eat. Give them a try, and enjoy the vibrant flavors and beautiful presentation!
Print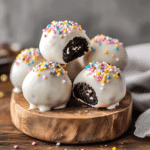
Easter Egg Oreo Cookie Balls: A Fun, Festive Treat
- Total Time: 45 minutes (including freezing time)
- Yield: About 24–30 Oreo cookie balls (depending on size) 1x
- Diet: Vegetarian
Description
These festive and fun Easter Egg Oreo Cookie Balls are the perfect treat for the holiday season! Made with Golden Oreos and cream cheese, then coated in white candy coating, they’re a sweet, creamy, and irresistible bite-sized dessert. Decorate with bright, colorful icing for an added touch of holiday cheer!
Ingredients
-
14.3 oz package (36 cookies) Golden Oreos (crushed into crumbs)
-
8 oz cream cheese (room temperature)
-
10 oz white candy coating
-
Additional 1 oz of white candy coating per color (for decorating)
-
Gel icing colors (for decoration)
Instructions
-
Start by crushing the Golden Oreos into fine crumbs, either by pulsing in a food processor or placing them in a zip-top bag and crushing with a rolling pin.
-
In a mixing bowl, combine the crushed Oreo crumbs with the cream cheese. Mix until fully combined and smooth.
-
Roll the mixture into small balls (about 1 inch in size) and place them on a baking sheet lined with parchment paper.
-
Freeze the balls for about 20-30 minutes, or until firm.
-
While the balls are freezing, melt the white candy coating according to package instructions.
-
Dip each ball into the melted white candy coating, fully coating them. Place them back onto the parchment paper to set.
-
After the coating has set, melt the additional candy coating in different colors using gel icing colors to tint it.
-
Decorate the balls with the colored candy coating, creating Easter egg-like patterns or designs as desired.
-
Let the decorated balls set for about 10-15 minutes before serving.
Notes
You can use any type of candy coating or chocolate coating if you prefer a different flavor.
For a smoother coating, make sure the Oreo balls are completely firm before dipping.
You can also drizzle the colored candy coating over the balls for a more artistic look.
- Prep Time: 15 minutes
- Cook Time: 10 minutes (for coating and decorating)
- Category: Dessert, Candy
- Method: No-Bake
- Cuisine: American
Keywords: Oreo balls, Easter treats, cookie balls, no-bake dessert, Easter egg cookies, festive candy, Golden Oreos