If you’re searching for a fun, festive, and fast treat to impress friends and family this spooky season, these Witch Hat Halloween Cookies are your golden ticket. Combining buttery cookie bases with colorful, edible accents, this recipe is perfect for last-minute celebrations or those who want to add a magical twist to their Halloween spread. Easy to make, delightfully delicious, and visually striking, these cookies bring Halloween charm and flavor in every bite. Let’s dive into making these enchanting treats that will quickly become a new holiday favorite.
Why You’ll Love This Recipe
- Speedy preparation: This recipe is designed to come together quickly, ideal for last-minute baking.
- Kid-friendly fun: Decorating the cookies is simple enough to enjoy with kids or as a group activity.
- Visual wow-factor: The unique witch hat design is perfect for Halloween parties and photo-worthy presentations.
- Minimal ingredients: Just a few pantry staples make these cookies simple and affordable.
- Customizable flavors: Easily adapt the base dough and decorations to match your favorite tastes and dietary needs.
Ingredients You’ll Need
These Witch Hat Halloween Cookies rely on simple staples, yet each ingredient plays a crucial role in creating that perfect balance of buttery crispness, rich flavor, and vivid decoration. Let’s look at what you’ll need before we get baking.
- All-purpose flour: The foundation for the cookie dough, providing structure and texture.
- Unsalted butter: Adds richness and tenderness while allowing you to control the salt level.
- Sugar: Use granulated sugar to give sweetness and slight crunch to the cookies.
- Vanilla extract: Infuses the dough with warm, comforting flavor that complements the buttery richness.
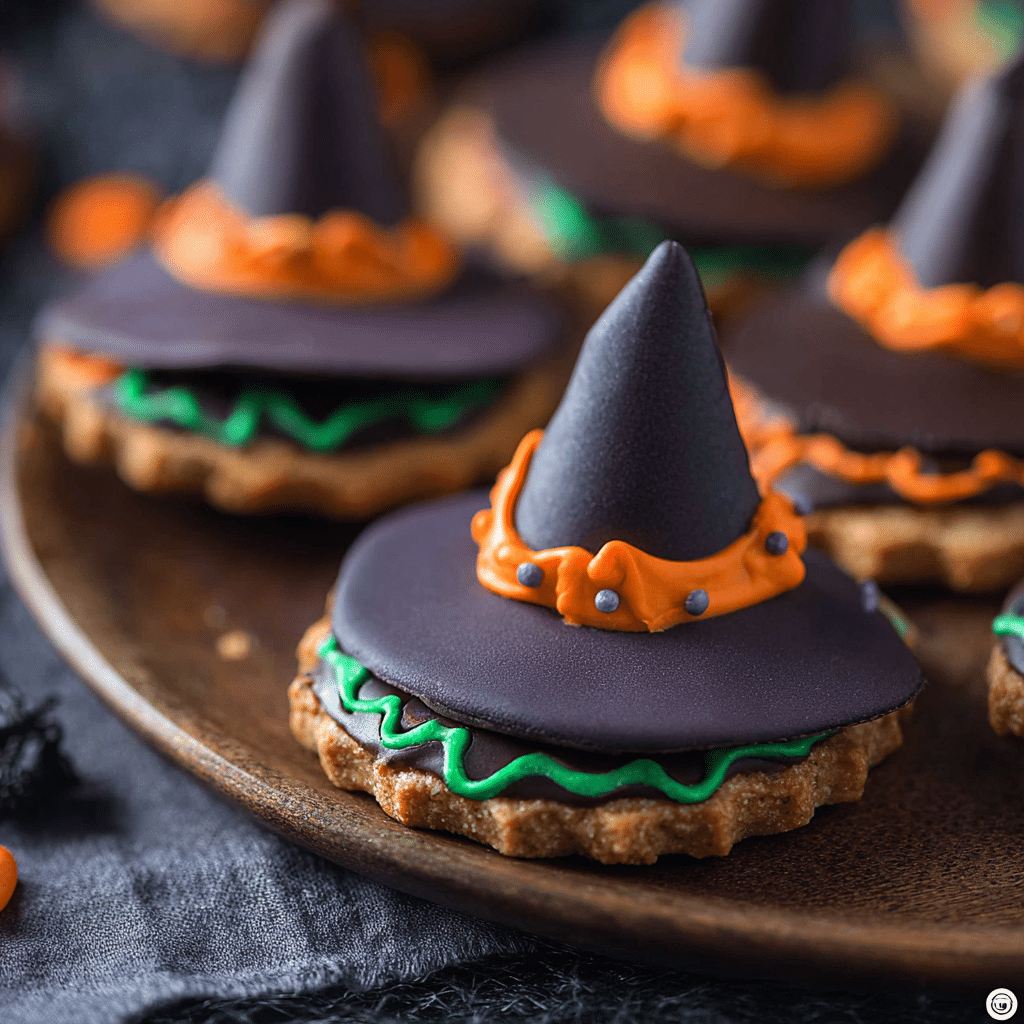
- Chocolate candies or chocolate-covered orange slices: Essential for crafting the iconic witch hat top, adding both flavor and festive flair.
- Orange and black icing or colored gel pens: For decorating the hats with Halloween colors and designs.
- Mini pretzels (optional): Can be used to make the “hatband” or add texture and crunch for extra festive appeal.
Variations for Witch Hat Halloween Cookies
One of the many joys of baking these Witch Hat Halloween Cookies is how effortlessly you can tweak the recipe to match your style or dietary requirements. Whether you want to alter flavors or get creative with decorations, here are some tasty ideas.
- Gluten-free version: Substitute all-purpose flour with a gluten-free blend for a safe and delicious treat.
- Chocolate cookie base: Use cocoa powder in the dough to make the cookie itself chocolate-flavored.
- Vegan adaptation: Replace butter with coconut oil and use egg replacers for a plant-based version.
- Spiced twist: Add cinnamon or pumpkin pie spice for extra seasonal flavor.
- Alternative decorations: Swap traditional chocolate candies for candy corns, gummy worms, or colored sprinkles for a playful look.

How to Make Witch Hat Halloween Cookies
Step 1: Prepare the Dough
Start by creaming your softened butter and sugar together until fluffy and pale using a hand mixer or stand mixer. Add vanilla extract and gradually mix in the flour until a smooth dough forms. Chill the dough for about 30 minutes to make it easier to handle and prevent spreading during baking.
Step 2: Shape the Cookie Bases
Once chilled, roll out the dough on a lightly floured surface to about 1/4 inch thickness. Use a round cookie cutter to cut circles that will become the “brims” of the witch hats. Place them on a baking sheet lined with parchment paper.
Step 3: Bake the Cookies
Bake the cookie rounds in a preheated oven at 350°F (175°C) for 10 to 12 minutes or until edges begin to turn lightly golden. Remove from the oven and let them cool completely on a wire rack before decorating.
Step 4: Assemble the Witch Hats
Choose your chocolate candies or chocolate-covered orange slices to serve as the pointed hats. Attach these to the round cookie base using a dab of royal icing or melted chocolate as “glue.” Allow them to set firmly.
Step 5: Decorate Your Creations
Use orange and black icing or gel pens to add details like hatbands, buckles, or spooky designs. Mini pretzels can be cleverly placed as additional embellishments or hat decorations to amp up the festive vibe.
Pro Tips for Making Witch Hat Halloween Cookies
- Chill the dough properly: This prevents the cookies from spreading too much and helps maintain the shape.
- Use parchment paper: It helps cookies bake evenly and makes cleanup a breeze.
- Decorate when fully cool: Icing or melted chocolate will melt or slide off if the cookies are still warm.
- Secure candy tops firmly: Let your glue (icing or chocolate) dry completely to keep your witch hats intact during transport.
- Experiment with icing tips: Different tip sizes make decorating easier and more professional-looking.
How to Serve Witch Hat Halloween Cookies
Garnishes
Sprinkle your cookies with edible glitter or colored sugar before the icing sets for extra sparkle. Fresh mint leaves or small candy pumpkins nearby can complement the presentation beautifully.
Side Dishes
Serve alongside a steaming hot cup of spiced apple cider, hot chocolate with marshmallows, or a colorful fruit platter that balances the sweetness of the cookies.
Creative Ways to Present
Arrange the cookies in a circular display on a spooky-themed platter to mimic a witch’s cauldron rim, or place them atop mini cake stands surrounded by Halloween décor like fake spider webs and mini pumpkins for an eye-catching centerpiece.
Make Ahead and Storage
Storing Leftovers
Store cooled cookies in an airtight container at room temperature for up to a week. Layer them with parchment paper in between to prevent sticking or crushing.
Freezing
Freeze plain baked cookies in an airtight container or zip-lock bag for up to three months. Decorate after thawing to keep icing fresh and vibrant.
Reheating
While these cookies are best enjoyed at room temperature, you can warm them slightly in a low oven (around 300°F) for 3-5 minutes to refresh texture and bring out the buttery flavor.
FAQs
Can I make Witch Hat Halloween Cookies gluten-free?
Yes! Simply swap the all-purpose flour for a gluten-free flour blend that measures like regular flour for a safe and tasty alternative without sacrificing texture.
What alternatives work for decorating if I don’t have icing?
Melted chocolate or candy melts work great as glue for attaching candy hats, and edible markers or colored sugar sprinkles can add visual details without traditional icing.
How do I keep my cookies from spreading too much?
Chilling the dough before baking and ensuring your oven temperature is accurate are key steps to maintain shape and prevent excessive spreading.
Can I make these cookies vegan?
Absolutely! Replace butter with coconut oil or vegan margarine, and use a flax egg or commercial egg replacer to make the dough vegan-friendly.
What’s the best way to transport these cookies?
Use a sturdy container lined with parchment paper, layering cookies with separate sheets to avoid breakage, and keep them cool to prevent melting decorations.
Final Thoughts
These Witch Hat Halloween Cookies truly capture the festive spirit of the season with minimal fuss and maximum charm. Whether you’re baking for a party, gifting to loved ones, or just satisfying your Halloween sweet tooth, this recipe is a delightful and speedy way to add a magical touch to your celebrations. Grab your ingredients, have fun decorating, and enjoy the smiles that come with every bite of these enchanting treats!